5 Lab 5: Staining
Lab Objectives
After completing this lab, the student should be able to:
- Use Aseptic Technique to prepare smears for staining.
- Examine smears to determine bacterial morphology, arrangement, and Gram reaction.
- Determine if a cell is positively or negatively charged and if a stain is direct, indirect, simple, or differential.
- Classify stained cells based on their cell structure as either Gram positive or Gram negative.
- Apply the Gram reaction to cell wall structure.
Introduction
Staining is a key skill in microscopy work because it helps to create contrast between cells and their background. If you have previously viewed stained slides, you are already aware of the contrast difference made by staining techniques. This lab will review how to create smears, stain smears, and explain simple and differential bacterial staining techniques.
Smears: Bacterial smears are created by applying cells to a microscope slide. If the cells come from a liquid preparation (e.g., a broth culture) then the cells are directly applied to the slide. However, if the cells come from a solid culture (e.g., a slant or plate), then a small drop of water is applied to the slide first then the cells are mixed into the drop of water. The reason why cells must be in a liquid is to allow for spreading out the cells into a thin film termed a smear. This reduced the number of cells in a physical space so that as the smear dries, cells are more evenly distributed and are less likely to trap stains. It is also important to ensure that cells have sufficient space between them so that cells can be easily seen to determine morphology and arrangement which becomes important in identification methods.
Before staining, cells must be “fixed” to adhere them to the glass microscope slide. Fixing slides can be accomplished in two ways: either through the use of strong fixatives (chemicals) such as alcohol or acetone in the case of human blood cells or by heat. Our lab will use heat fixing as the method of choice. To heat fix a smear, you will simply run the slide through the top portion of the Bunsen burner flame twice.
Types of Stains: Stains are classified based on charge of the chromophore (colored ion). Because the overall net charge of a bacterial cell is negative, positively charged chromophores are attracted to the bacterial cells and will directly stain the cells – thus direct stains are stains that contain positively charged chromophores. Negative stains, on the other hand, use negatively charged chromophores that are repelled by the bacterial cell and stain the slide (“background”) so that the bacterial cells appear colorless on a dark background.
Negative stains do not require heat fixing so negatives stains are used when one wants to observe living cells for motility. Because negative stains are not heat fixed, the cells will appear crisper thus determining morphology and arrangement can be a bit easier than with direct stains.
So when would a direct stain be used? Direct stains are the most common stain type in the microbiology lab. They can be used for both simple and differential staining techniques. Simple stains will use one chromophore while differential stains use at least two chromophores in separate staining steps to differentiate bacteria based on cell wall type, structures, or even cell membrane permeability. Listed below are some common differential stains used in the microbiology lab:
Table 1. List of Common Differential Stains in Microbiology Lab
|
Staining Protocol
|
Stains (charge)
|
Differential for…
|
|
Gram Stain
|
Crystal Violet (+), Safranin (+) |
Cell wall (Gram positive/ negative) |
|
Acid Fast
|
Carbol Fuchsin (+), Methylene Blue (+) |
Cell wall (Acid fast/ non-Acid fast) |
|
Endospore
|
Malachite Green (+), Safranin (+) |
Endospores and vegetative cells |
Morphology and Arrangement: Bacterial morphology and arrangement are important for helping to classify and identify bacteria. Morphology refers to the shape of the bacterial cell. Common bacterial morphologies are:
- bacillus (rod)
- coccus (spherical)
- spirillum (spiral shaped).
Arrangement refers to how cells are spaced with respect to each other. Typical arrangements for bacteria include:
- strepto (chain)
- staphylo (grape-like clusters)
- tetrad (clusters of four cells)
- sarcina (clusters of eight cells)
- single/diplo (one or two cells – These terms are frequently used together because it is difficult to determine if a cell has just divided rather than truly being a pair.)
In today’s lab, we will practice simple direct, simple negative, and the Gram staining techniques on our unknow culture(s). Because we will be working with bacterial unknowns, it is important to practice good aseptic technique. Due to the small size of the cells, oil immersion will need to be used to view the stains. To prevent stain getting onto the microscope, be sure to complete all of your stains before getting out your microscope.
Method (In Lab)
For this lab you will need:
Unused slides
Compound light microscope
Bacterial culture
Eosin dye
Disposable plastic container or paper plate
Toothpicks
Instructions for Negative Stain
Before beginning this lab exercise, you should thoroughly wash your hands with warm soap and water and wipe down your bench using the provided disinfectant.
Remember that the negative stain is not heat fixed so these cells will still be alive after staining.
1. Make a smear by placing a small drop of eosin stain in the center of a clean glass slide.
2. Place the slide on a surface that will not take the stain or that can be thrown away such as disposable plastic container, paper plate, or piece of foil/ wax paper/ parchment paper.
3. Working close to a lit candle, collect a small amount of bacterial growth from your plate with a toothpick and mix into the drop of eosin and smear the drop into a large circle.
4. Set the slide aside to air dry. Be sure to place the slide in a location where it will not be splattered.
5. Observe the slide with the 60x objective lens after completing and putting away all staining materials.
6. Record your observations below.
Because these stains are not included in your microscope kit and they require more materials, you will watch videos of the Gram stain procedure and the simple direct stain procedure on Canvas. Be sure you are confident in your understanding of these techniques as they are commonly used in microbiology and clinical lab – and they’ll be on your lab report and lab quiz assessments. Protocols are listed below for both the Simple Direct and the Gram Stain for your reference. You will not actually be doing these two staining procedures (Simple Direct Stain and Gram Stain).
Instructions for Simple Direct Stain and Gram Stain
1. Make a smear by adding a small drop of water to a clean slide. Use a clean inoculating loop to catch a small drop of water from the DI water bottle located in your staining drawer.
2. Aseptically transfer a small amount of S. aureus into the drop of water and smear into a large circle.
3. Allow the slide to air dry either by leaving on your bench or taking to the slide warmer.
4. Once the slide has completely dried, heat fix the slide by passing it through the top of the Bunsen burner flame twice.
5. Stain the slide:
- Place the slide on the wire staining rack in the metal staining tray.
- Apply methylene blue stain until the slide is covered and incubate for 60sec.
- Using the water bottle found in the staining tray, wash off excess stain.
- Blot in the bibulous paper book as demonstrated by your instructor.
- Set the slide aside until ready to view once staining has been complete.
Instructions for Gram Staining
1. Make three smears by adding three small drop of water to a clean slide. Use a clean inoculating loop to catch a small drop of water from the DI water bottle located in your staining drawer.
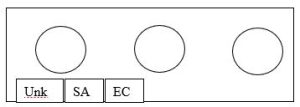
Figure 1. Slide layout for Gram Staining.
2. Aseptically transfer a small amount of cells into the respective drops of water. For this slide, you will stain all three organisms on the same slide with EC (E.coli) and SA (S. aureus) as the Gram stain controls.
3. Allow the slide to air dry either by leaving on your bench or taking to the slide warmer.
4. Once the slide has completely dried, heat fix the slide by passing it through the top of the Bunsen burner flame twice. Because there are three smears on this slide, you may need to rotate the slide 180⁰ to ensure even heating of all smears.
5. Stain each smear by:
- Apply crystal violet to cover the three smears for 60sec. Wash with water but do not blot with the bibulous paper until the end of the staining procedure. It is fine if water remains on the smears after washing.
- Apply Gram’s iodine to each smear for 60sec. Wash with water.
- Apply ethanol (EtOH) to the smear for approximately 10-20 sec until large amounts of purple are no longer being rinsed out of the smears. Immediately rinse with DI water.
- Counterstain cells by applying safranin for 60sec. Wash with water and blot dry with bibulous paper.
- Set aside the slide until you have finished staining then view with oil immersion.
Clean up from staining
Before getting out the microscopes, make a bit more room on your work bench by putting away your staining materials. Carefully rinse out and dry the staining pans before returning them to the common second drawer. Put away stains, water and EtOH bottles, loops, Bunsen burners, striker, and bibulous paper.
Nigrosin Stain

Organism: Unknown
Morphology ________
Arrangement ________
